Showing posts with label Tech. Show all posts

Friday, October 25, 2019

Splunk's Adaptive Response Framework

Before I start this post, I want to give a quick shout out to Splunk. I recently just got back from my first .conf and I have to say, overall it was one of the best conferences I've ever been to.

Seeing all of the great talks made me want to do a better job of documenting some of the item's I've worked on over the past few months, especially with regards to the Adaptive Response framework within Splunk Enterprise Security.

Overview of Adaptive Response
For those of you who are not very familiar with it, I highly recommend reading the Splunk Dev page on it found here, but at a high level, it's a way to streamline your notable events and add some automation to the mix.

I know, I know, but Phantom does all of that and 100x more. I 100% agree with you and would love to use Phantom but due to various reasons, we do not have that right now so we're trying to utilize as many features as possible within Splunk without paying anymore $$.

Unfortunately due to the Phantom acquisition, there doesn't seem to be much of a focus on Adaptive Response and it was one of the few things I was disappointed about at the conference. Thus, why I'm creating this post now!

How to Create Your First AR
To start out, we'll go through the high level steps to create an Adaptive Response rule. The full details can be found in Splunk's documentation.

1.  Install the Add-on Builder from Splunkbase.
  • I've read quite a few things about not installing this on a production ES search head due to performance reasons but overall we haven't had that big of an issue with it. From time-to-time it will take a significant time to save the app but overall we found that it's easier to run through test cases directly on it due to our environment. If you have a few dev/test environment, I would do it there.
2.  Now that the Add-on builder is installed, depending on the permissions you may need to log in as Admin and ensure whoever is creating these responses has the appropriate permissions. You can then access it from the App drop down menu on the top left.

3.  Once you are in the app, select "new Add-on" and give it whatever name you want. The naming scheme will vary greatly depending on the organization but just make sure you keep a similar naming scheme across the board that is very clear for the analyst to know what action is being performed.

4.  After you create the app, it will then take you another screen where you can start digging into what you want the app to truly do. For our use case, we are only interested in Adaptive Response so we're going to only use the "Create Alert Actions" field. Then select "New Alert Action".

5.  The first screen, Properties, is fairly self explanatory. The main thing you want here is to yet again abide by a naming convention and make sure you select the "Support as an ad-hoc action" button. For ours, we also gave each Adaptive Response (AR) a generic source type so we can search for it later if needed.

6.  The next page is where we finally get into doing some actual work and not just clicking through everything. This is where you define various variables that will either be hard coded, pulled from the notable events fields, or have a free form/drop down option for the analyst to pick.
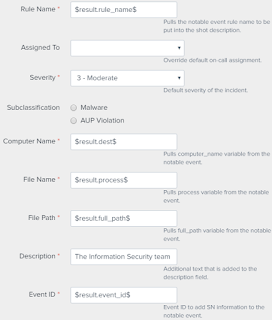
In the screenshot below, you can see I have multiple variables that I'm pulling out from the notable as well as three fields that allow the analyst to pick who it's assigned to, what the sub-classification is, and the default description. 


7.  The final page is where half of you will be really excited that you can write some Python and the other half will probably cry. This is where all of the variables you defined in the previous screen come together and you tie it into whatever automated action you want to occur. 

Before we move on, I will start out by saying I am not a programmer. There are probably plenty of items in the code that will make you real programmers cringe, but the code works. I welcome any recommendations and will always try to make things better as I can.

Now that the disclaimer is over, let's move on. Here is a fairly modified version of the code we're using to auto create ServiceNow tickets based off of Splunk malware notable events.

I removed about 60 lines that we use for tying into CMDBs and routing tickets depending on geographic location, host name, etc. But to make things simpler, I removed the majority of it and focused on how to create the SN ticket with variables and update the notable.  

Adding AR to Correlation Rules
Now that you have AR setup, tested, and ready to roll, let's add it to the correlation rule. This process is pretty easy so we'll blow through it in a few steps.
  1. Enterprise Security --> Configuration --> Content --> Content Management
  2. Select the correlation rule you want AR to be tied to. 
  3. At the bottom of the screen, select the Notable event that you have already setup and simply click on "Insert Adaptive Response Action" to the "Next Steps" field.
Bringing it All Together
Now when an analyst opens a notable event they'll see your AR rule ready to roll.

The screenshot below is from a notable event that popped in the Incident Review page. Once you click on the Host-AV next steps, it will bring up the previous screenshot that will pull the variables and allow you to edit whatever you want to.


After that finishes, it will update the history with the SN ticket URL as well as close out the notable event.


Closing Notes
This is just one of many examples of what we've been doing with AR. While there is a decent learning curve and some gotchas along the way, I think it's a highly under utilized tool that allows you to streamline your workflows.

Assuming this is useful for others, I can add some of the more complicated ones we've done that don't require any analyst interaction at all and just runs ARs once notables are hit.

Please let me know if you have any questions/comments.

Wednesday, September 28, 2016

NxLog For the Win

About a year ago Brian Wilson and myself talked about ELK at Raleigh InfoSeCon. As many of you know, ELK (ElasticSearch/Logstash/Kibana) is a wonderful solution for log management and it's completely free if you know what you are doing. If you are interested, that presentation can be found here. It's a little outdated due to the new versions of the software but still gives a good high level overview of the infrastructure. During the presentation we also briefly looked at NxLog as a log forwarder for our Windows environment.

Over the past few months, we've had the need to start pulling additional Window Event logs and formatting them for ingest of other products. While this seems fairly straight forward, it posed quite a few problems due to our infrastructure having multiple domains across the world and the fact that Windows event logs suck.

So let's start out by looking at a fairly basic NxLog config and what all it does.

<Extension _syslog>
    Module      xm_syslog
</Extension>
<Input in>
    Module       im_msvistalog
    ReadFromLast True
    Query <QueryList>\
      <Query Id="0">\
<Select Path="Security">*[System[(EventID='4624')]]</Select>\
<Select Path="Security">*[System[(EventID='4625')]]</Select>\
<Select Path="Security">*[System[(EventID='4648')]]</Select>\
<Select Path="Security">*[System[(EventID='4740')]]</Select>\
<Select Path="Security">*[System[(EventID='4768')]]</Select>\
    </QueryList>
    Exec to_syslog_bsd();
    Exec if $raw_event =~ /Account Name:\s+\S+\$\s+Account Domain:/ drop(); \
         else if $raw_event =~ /^(.+)(Detailed Authentication Information:|Additional Information:)/ $raw_event = $1; if $raw_event =~ s/\t/  /g {}    
</Input>
<Output out>
    Module        om_udp
    Host   X.X.X.X
    Port YYY
</Output>
<Route 1>
    Path        in => out
</Route>
The first section is fairly straight forward on calling the module xm_syslog since that is how we are sending the logs to our syslog cluster. The "Input in" section is where we start our modifications. At a high level, this section determines what logs NxLog will pay attention to. There are multiple ways to do this but I felt that listening out the event IDs per line made it very easy to read and we can quickly add/remove IDs if needed.

Once we pull all of the events we are interested in, we get to the real benefit of NxLog, being able to modify logs before sending them out. The first Exec statement is just converting the Windows format to syslog format since that is what I'm more comfortable and familiar with. After that, we have 2 if statements that provide additional filtering.

The first if statement looks to see if the Account Name has a $ in it. When reviewing the raw logs from our Domain Controllers, we saw a lot of computer logins which were out of scope for our project. Since none of our usernames has a $ in it, we simply drop them from the start.

The next statement then looks at the raw event, the one line syslog formatted Windows event, and says capture everything before "Detailed Authentication Information" or "Additional Information" and store that as a variable. From there, take that variable and make it the new $raw_event and then if there are any tabs in it, replace it with spaces.

So for anyone who is not familiar with how ugly and cumbersome Windows event logs can be, these few minor changes make a world of difference. The log then goes from this:
Sep 28 12:34:02 server.domain.com Microsoft-Windows-Security-Auditing[572]: An account was successfully logged on.    Subject:   Security ID: S-2-5-14   Account Name: SERVERDC1$   Account Domain: EXNETTST   Logon ID: 0x3f8    Logon Type: 10    New Logon:   Security ID: S-1-5-21-1092342493-3311231447-1094723392-1211   Account Name: user1   Account Domain: EXNETTST   Logon ID: 0x123331bc9   Logon GUID: {36616666-71C5-66A9-222-AB4540DG1FD6}    Process Information:   Process ID: 0xdee0   Process Name: C:\Windows\System32\winlogon.exe    Network Information:   Workstation Name: SERVERDC1   Source Network Address: 192.168.1.3   Source Port: 7255    Detailed Authentication Information:   Logon Process: User32   Authentication Package: Negotiate   Transited Services: -   Package Name (NTLM only): -   Key Length: 0    This event is generated when a logon session is created. It is generated on the computer that was accessed.    The subject fields indicate the account on the local system which requested the logon. This is most commonly a service such as the Server service, or a local process such as Winlogon.exe or Services.exe.    The logon type field indicates the kind of logon that occurred. The most common types are 2 (interactive) and 3 (network).    The New Logon fields indicate the account for whom the new logon was created, i.e. the account that was logged on.    The network fields indicate where a remote logon request originated. Workstation name is not always available and may be left blank in some cases.    The authentication information fields provide detailed information about this specific logon request.   - Logon GUID is a unique identifier that can be used to correlate this event with a KDC event.   - Transited services indicate which intermediate services have participated in this logon request.   - Package name indicates which sub-protocol was used among the NTLM protocols.   - Key length indicates the length of the generated session key. This will be 0 if no session key was requested.
To this:
Sep 28 12:39:00 server.domain.com Microsoft-Windows-Security-Auditing[572]: An account was successfully logged on.    Subject:    Security ID:    S-1-1-0    Account Name:    -    Account Domain:    -    Logon ID:    0x0    Logon Type:      3    Impersonation Level:    Impersonation    New Logon:    Security ID:    S-1-5-21-1843002-1947066824-37174299-191115    Account Name:    user1    Account Domain:    DOMAINNAME    Logon ID:    0x403432AC2    Logon GUID:    {14446E51-C7F8-B344-E16F-7A8DF1C2D33}    Process Information:    Process ID:    0x0    Process Name:    -    Network Information:    Workstation Name:      Source Network Address:  192.168.1.3    Source Port:    51223
While that makes a huge difference, there is room for improvement. One particular area of trouble we ran into was that Kerberos events and Windows Event ID 4624 logon events were quite a bit different. If you are relying on an application on the back end that doesn't support multiple regex filters or expects a uniform format from all logs, it poses a problem.

So back to the nxlog.conf file we go. Our new Exec commands would look like this:

    Exec to_syslog_bsd();
    Exec if $raw_event =~ /Account Name:\s+\S+\$\s+Account Domain:/ drop(); \
         else if ($EventID == 4624 or $EventID == 4768) $raw_event = "Time:" + $EventTime + ", EventID:" + $EventID + ", LogonType:" + $LogonType + ", User:" + $TargetDomainName + "\\" + $TargetUserName + ", IPAddr:" + $IPAddress; \
   else if $raw_event =~ /^(.+)(Detailed Authentication Information:|Additional Information:)/ $raw_event = $1; if $raw_event =~ s/\t/  /g {}
We start out the same but our second if statement has a sub-filter in it. If the Event ID matches 4624 or 4768, then do some additional parsing. By default, NxLog is aware of certain fields and stores them as variables. You can look up the full list on the NxLog man page but the fields above are the ones we were interested in. After that parsing, it then goes back to our previous regex for any other ID that comes through. Below is an example of a 4624 and 4768 event.
Sep 28 00:14:20 server.domain.com Time:2016-09-28 00:14:20, EventID:4624, LogonType:3, User:DOMAIN\user1, IPAddr:192.168.1.66
Sep 28 00:14:21 server.domain.com Time:2016-09-28 00:14:20, EventID:4768, LogonType:, User:DOMAIN.COM\user2, IPAddr:::ffff:192.168.5.2
As you can see, we now have a very clean format that the end device can parse out. There is more room for improvement to get rid of the :::ffff: in the Kerberos events but we were able to parse them out on the back end.

So overall, NxLog is amazing. It allows you to take the load off of your central syslog cluster and distribute it across all of your endpoints that are generating logs. This also decreases the amount and size of events coming into your cluster from the start so you are only getting exactly the items that you need.

Hopefully this will help someone out in the same situation. Please let me know if you have any questions/comments.

Splunk's Adaptive Response Framework

Before I start this post, I want to give a quick shout out to Splunk. I recently just got back from my first .conf and I have to say, overal...