Friday, October 25, 2019

Splunk's Adaptive Response Framework

Before I start this post, I want to give a quick shout out to Splunk. I recently just got back from my first .conf and I have to say, overall it was one of the best conferences I've ever been to.

Seeing all of the great talks made me want to do a better job of documenting some of the item's I've worked on over the past few months, especially with regards to the Adaptive Response framework within Splunk Enterprise Security.

Overview of Adaptive Response
For those of you who are not very familiar with it, I highly recommend reading the Splunk Dev page on it found here, but at a high level, it's a way to streamline your notable events and add some automation to the mix.

I know, I know, but Phantom does all of that and 100x more. I 100% agree with you and would love to use Phantom but due to various reasons, we do not have that right now so we're trying to utilize as many features as possible within Splunk without paying anymore $$.

Unfortunately due to the Phantom acquisition, there doesn't seem to be much of a focus on Adaptive Response and it was one of the few things I was disappointed about at the conference. Thus, why I'm creating this post now!

How to Create Your First AR
To start out, we'll go through the high level steps to create an Adaptive Response rule. The full details can be found in Splunk's documentation.

1.  Install the Add-on Builder from Splunkbase.
  • I've read quite a few things about not installing this on a production ES search head due to performance reasons but overall we haven't had that big of an issue with it. From time-to-time it will take a significant time to save the app but overall we found that it's easier to run through test cases directly on it due to our environment. If you have a few dev/test environment, I would do it there.
2.  Now that the Add-on builder is installed, depending on the permissions you may need to log in as Admin and ensure whoever is creating these responses has the appropriate permissions. You can then access it from the App drop down menu on the top left.

3.  Once you are in the app, select "new Add-on" and give it whatever name you want. The naming scheme will vary greatly depending on the organization but just make sure you keep a similar naming scheme across the board that is very clear for the analyst to know what action is being performed.

4.  After you create the app, it will then take you another screen where you can start digging into what you want the app to truly do. For our use case, we are only interested in Adaptive Response so we're going to only use the "Create Alert Actions" field. Then select "New Alert Action".

5.  The first screen, Properties, is fairly self explanatory. The main thing you want here is to yet again abide by a naming convention and make sure you select the "Support as an ad-hoc action" button. For ours, we also gave each Adaptive Response (AR) a generic source type so we can search for it later if needed.

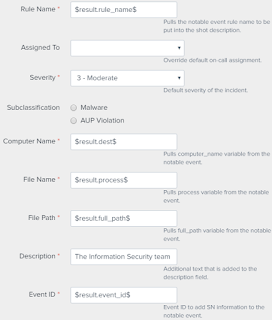
6.  The next page is where we finally get into doing some actual work and not just clicking through everything. This is where you define various variables that will either be hard coded, pulled from the notable events fields, or have a free form/drop down option for the analyst to pick.

In the screenshot below, you can see I have multiple variables that I'm pulling out from the notable as well as three fields that allow the analyst to pick who it's assigned to, what the sub-classification is, and the default description. 


7.  The final page is where half of you will be really excited that you can write some Python and the other half will probably cry. This is where all of the variables you defined in the previous screen come together and you tie it into whatever automated action you want to occur. 

Before we move on, I will start out by saying I am not a programmer. There are probably plenty of items in the code that will make you real programmers cringe, but the code works. I welcome any recommendations and will always try to make things better as I can.

Now that the disclaimer is over, let's move on. Here is a fairly modified version of the code we're using to auto create ServiceNow tickets based off of Splunk malware notable events.

I removed about 60 lines that we use for tying into CMDBs and routing tickets depending on geographic location, host name, etc. But to make things simpler, I removed the majority of it and focused on how to create the SN ticket with variables and update the notable.  

Adding AR to Correlation Rules
Now that you have AR setup, tested, and ready to roll, let's add it to the correlation rule. This process is pretty easy so we'll blow through it in a few steps.
  1. Enterprise Security --> Configuration --> Content --> Content Management
  2. Select the correlation rule you want AR to be tied to. 
  3. At the bottom of the screen, select the Notable event that you have already setup and simply click on "Insert Adaptive Response Action" to the "Next Steps" field.
Bringing it All Together
Now when an analyst opens a notable event they'll see your AR rule ready to roll.

The screenshot below is from a notable event that popped in the Incident Review page. Once you click on the Host-AV next steps, it will bring up the previous screenshot that will pull the variables and allow you to edit whatever you want to.


After that finishes, it will update the history with the SN ticket URL as well as close out the notable event.


Closing Notes
This is just one of many examples of what we've been doing with AR. While there is a decent learning curve and some gotchas along the way, I think it's a highly under utilized tool that allows you to streamline your workflows.

Assuming this is useful for others, I can add some of the more complicated ones we've done that don't require any analyst interaction at all and just runs ARs once notables are hit.

Please let me know if you have any questions/comments.

Tuesday, September 3, 2019

Mummy Mt (Crystal & Lawn Lake)

Drive & Parking
From Denver it took me about 1.5 hrs. but that was at 4:45 am. If you get stuck behind some slow vehicles going into the mountains or you go later and hit tourist traffic in RNMP, this number can drastically go up.

The parking lot wasn't that big but if you go early in the morning, it shouldn't be a problem. When I came back to the trail head, cars were parked up and down the road so you should be able to park anytime as long as you aren't too late.

Distance
By the time it was all said and done, I was at 18.46 miles. This can vary quite a bit depending on the route you take up Mummy Mt. since there isn't a real trail.

Elevation
Total vert was around 5,100 with a final elevation of ~13,300.

Difficulty
If you just did the trail to Crystal and Lawn Lakes, it would be a fairly moderate hike. Going up Mummy turns it into a hard hike for multiple reasons.

  1. 16+ miles is a long day.
  2. The climb up Mummy isn't part of an established trail so you need some route finding skills and be ready to just grind uphill for a fairly long time.
  3. The route I took down from Mummy was not a very good one. It had a ton of loose rocks and made for a more technical descent than I had planned.

The Hike
To start out, RMNP is a beautiful place if you get there before all of the crazy tourists. I started around 6:30 am and I only saw one person on the trail as I was heading up to the lakes.

The first mile or so is a fairly steady uphill climb and then it levels out a little bit and you start getting some good views of Roaring River. It's a pretty peaceful/wooded hike until you get to the split where you go left to Crystal/Lawn or go right to start looping around Mummy. Below is a picture of Mummy from the trail.


I also saw a moose friend as I was walking.


For the route that I took, I turned right and followed the Black Canyon Trail which allows you to loop around Mummy and take a less vertical route up. I actually should have looped a little further but it still worked out for me. You can really shoot in at any point in time but I waited until I was right at the treeline until I shot left and up the mountain.

The picture below shows the route I took (red). The blue is where I wish I would have gone from an ease perspective. On the right side, looping further right would reduce how fast you gain elevation with only adding a little distance and on the left side that will prevent you from hitting a lot of the loose boulders and cliffing out. 

The purple route is what I wanted to do but I just wasn't feeling it. It would allow you to hit two 13ers and the decline from Hagues to The Saddle (yes, it's actually called that and should be capitalized), is a lot better path.


Anyway, back to the hike. My trip up Mummy on the far right wasn't that bad from a technical perspective, it just required a little bushwhacking and endurance if heading uphill. Once you start getting up the mountain, you have some very pretty views of various lakes and the woods around them.


As you continue to climb up the mountain, you start to see Lawn Lake a little better.


Then at the very top, you can see Crystal Lake with some pretty sweet mountains behind it.


As I mentioned above, once I get to Mummy, instead of veering right and heading up Hagues, which would include a decent amount of decline + incline to get back up, I just shot down the valley and headed toward the lakes and the real trail. The further you go right, the better it looked. Here is a picture of the route I took down which was not fun.


Once you get back to the real trail, it's smooth sailing the rest of the way home. Even though it's about 6ish miles, the majority of it is downhill. You also get to swing by Lawn Lake and see a few streams which are really pretty.


The area was beautiful and I definitely plan on going back and knocking out Mummy Mania (all of the 13ers). Just make sure you get there very early to beat the crowds.

Sunday, August 18, 2019

Rogers Pass Trail (Heart Lake)

Drive & Parking
This hike is close to Winter Park, CO but you don't take the normal Winter Park route over the pass. We went west of Golden and wound through some mountain roads and then went south of Nederland. Once you turn south, you are on a paved road for a little while longer but then the last 6ish miles is gravel. It's a little bumpy but not horrible. It took us a little over 1.5 hrs to get there.

There was a race going on the day we went so the parking lot was packed but luckily there is a ton of parking. I'd get there early just to get some peace of mind but you should always be able to park somewhere.

Distance
If you just go to Heart Lake it's about a 9 mile round trip. We ended up going up the pass and clocked in just shy of 10 after roaming around the lakes a little.

Elevation
You start out around 9,000 and ended up around 11,000 if you just go to Heart Lake. We ended up going up the pass which added about .5 miles both ways but ~800 more vert. At the end of the day, my Garmin said 2,861 total elevation gain.

Difficulty
For the majority of the hike, I would say this is a moderate difficulty. While it's a decent amount of vert, it's spread out quite a bit. The hardest part is right before you get to Heart Lake and Roger's Pass. These sections are not technical at all but are fairly steep.

The Hike
We started out hike around 8:11 am. As I mentioned above, there were a lot of people in the parking lot but we honestly didn't run into many people on the trail. It's a fairly popular fishing and camping site so I think a lot of people were either already fishing or still sleeping in when we started.

The entire hike until the last mile or so is in a wooded area that follows South Boulder Creek. There isn't much to see in this part of the trail even though it was nice to be by the water a lot and have some shade. After some recent fairly steep hikes, it was a nice change of pace to just be in the woods for a while.

The trail is a fairly steady uphill climb and there are quite a few rocks and roots that you have to be careful on as well as a few creek crossings but they are all fairly well maintained.

Once you get close to Rogers Pass Lake, it starts to open up quite a bit and you get some good views of the mountains around you, tons of streams, and some pretty wildflowers. There is also a pretty nice waterfall right before this section.


Even though the original hike we were going to was Heart Lake, Rogers Pass Lake is much prettier in my opinion. Below are a few pictures of it both from the lake itself and from Rogers Pass above it.


As I mentioned, since it was the Heart Lake trail, here is a picture of Ali and her heart pose.


I would recommend this hike to anyone. It has a great combination of trees, water, mountain views, and lakes. Minus it getting a little crowded around the top of the pass and around the lakes, I didn't have any complaints.

Tuesday, August 13, 2019

Shelf Lake

Drive & Parking
The drive took a little over 1.5 hrs from Denver. It's a very easy trip until the last 3 miles. During this portion, you go to a gravel/rock road that is very very bumpy and depending on the recent weather conditions, may have a decent amount of water on it.

We saw quite a few cars make it through as you drive around the campgrounds but I would recommend some decent clearance on your car before going down here.

The parking lot was a decent size. We got there around  7:45 and had plenty of space.

Distance
For once, both All Trails and my Garmin tracked us right at 6.8 miles.

Elevation
~1,900 elevation gain with a max elevation of around 11,500.

Difficulty
This is a fairly moderate to easy hike. There is some elevation gain but it's very gradual and no technical portions.

The Hike
I'll start out by saying this hike was just sub par. The first few miles are winding uphill through the forest with a lot of Aspen trees around you. I'm sure it would be pretty during the Fall.

Once you break through the trees, you start to get some views of the mountains around you which is pretty nice. As you get closer to the lake, there were some very nice wild flowers and a pretty waterfall with a mountain peak as the backdrop.


You'll continue through a fairly open section for a few miles until you finally hit the lake. The lake is nice but nothing special at all. There were a handful of fisherman there and it started to rain once we hit the end so we didn't spend much time there.


It was nice to get out and the wild flowers were pretty, but I would say that was the highlight of this hike.

Monday, August 12, 2019

Longs Peak - Keyhole Route

Drive & Parking
It only took us about 1.5 hrs. from Denver to get to the trail head, however we left at midnight so there wasn't much traffic. The road is paved the entire way and it was a very easy drive compared to other hikes.

The trail head parking lot is a decent size with a lot of parking along the road which adds mileage to the hike, but gives you flexibility if get you there late. The lot fills up very quickly so the sooner the better.

Distance
I've seen a lot of different numbers on this that range from 13 to 14 miles. My Garmin tracked us at 15.9 once it was all said and done. We did a little walking around at the top and took a small detour around Chasm Lake. I think it's probably closer to the 14 - 15 mile range but due to how much scrambling and rock hopping we had to do, it zig zagged us a lot on parts of the mount.

Elevation
The trail head starts around 9,400 and the peak is 14,259. My Garmin tracked 4,915 feet which is pretty close.

Difficulty
This is a hard trail no matter how you look at it. It's a long distance with a lot of elevation gain. You really have to break this trail down into multiple parts.

Trail head --> Boulder Field
This part is a steady uphill climb but nothing technical at all.

Boulder Field --> Key Hole
This portion requires some boulder hopping but nothing crazy. It gets tiring due to the elevation and you have to be care not to slip.

Key Hole --> Summit
This is where the hike truly begins. You do not need to perform this hike if you are scared of heights/exposure, not in good shape, or confident with scrambling and some minor rock climbing moves.

I think the picture below describes it well.


The Hike
We started the hike at 1:45 am on Sunday morning. There were a handful of other people in the parking lot but not bad at all. The first few miles of the hike are in a wooded area that follows a stream. This part of the hike is pretty straight forward as you just start a gradual climb up.

Once you leave the forest, you start the alpine tundra portion of the hike. This was beautiful at night as you could see the outlines of the mountains with the moonlight and the stars were amazing with no lights around. On our way back down, it provided some pretty views of the surrounding area but was fairly exposed if weather is coming in. Depending on the conditions, it can get pretty wet in this area leading up to the boulder field and we had to do some rock hopping to avoid streams.

Below is a picture with longs in the background on our way back down.


Around 6 miles in, you reach the boulder field. It was still pitch black by the time we got here but navigated the area pretty easily with head lambs. You have to be careful jumping around but it's pretty basic scrambling. If we weren't trying to beat weather, I would recommend catching the sunrise at the keyhole as it would have been beautiful. However, we were on a timeline with storms coming in so had to keep on going. Here is a quick pic from the keyhole with the sun starting to come up and a few hikers below us.


Once you go through the keyhole, you get some pretty amazing views of the mountain range on the other side.


The next portion of the hike is called "The Ledges". It's not a very long portion of the hike with minimal elevation gain but it's the first part that truly gets you some exposure as you horizontally go across the mountain.

Here are a few pictures of this area of the hike, even though they don't do it justice.


The next portion of the trail is called The Trough. This is a fairly short section but it's about 600 elevation gain and more of a climb vs. a hike. While this part was hard from a cardio perspective and needed some decent scrambling techniques, it wasn't nearly as exposed as you were going up vs. horizontal. Here is one pic from the bottom looking up and top looking down.


After you get to the top of this portion of the trail, you think you are close but you are terribly wrong. You then make a left on the other side of the mountain and hit the Narrows. This has the most exposure and a almost sheer drop off. Some sections of the trail are only around 3 -4 feet wide.

Here's a picture of my friend Brian start out and one showing the view off the side.


Once you finally get off the narrows, it's time for the final push to the top. This is called the Homestretch. It's only about .2 miles long but around 280 vert. This was a class 3 slope and not terribly technical in most areas. You just had to pay attention to make sure you were picking your route correctly and had three points of contact whenever possible. We got into a few areas where a minor rock climbing move was needed but nothing crazy. It was very tall through and tiring.


Then we finally made it to the top! It took us 5.5 hrs. total. Unfortunately as soon as we hit the top, we started to get sleeted on with some rain as well so didn't get to enjoy the views much.


The climb down was one of the worse things I've ever done. Even though it only rained a little, it made the rocks very very slick and for the first portion of the climb down we were literally sliding down on our butts a few feet at a time and finding places where we could stop ourselves. Since it was so slick and steep, this was a very dangerous portion of the trail in those conditions.


As we continued to go down, the rain picked up and it even started to lightening in the distance with some pretty loud thunder as we hit the narrows. The narrows and other ledges were very dangerous in the wet conditions and we had to go very slow going down making sure all of our handholds/footholds were solid.

After what felt like 90 hrs. of getting to the keyhole, we were finally able to relax a little since even though the boulder field was still dangerous with slick rocks, the exposure was not there. We ended up getting rained on until Chasm Lake until it lightened up and we finished the long haul back.

Here's a picture of Chasm Lake from the trail and it's pretty awesome seeing Longs Peak in the background knowing we just came from there.


I'm very glad I did it, but doubt I would do it again. The views and scenarios you are put in are challenging but fun. If it wasn't for the wet conditions, it wouldn't have been bad at all. I highly recommend never even thinking about going up there or turning around quickly if rain is on the way. It made the trail significantly harder.

All-in-all, it took is 10 hrs 36 min for the round trip. Which is pretty solid considering the conditions. If it wasn't wet, we would have easily shaved off 40 minutes of that time.

Saturday, August 3, 2019

Woods and Parnassus Mountain

Drive & Parking
This is a really easy drive from Denver. It took us a little under an hour to get there and only the last mile or so was gravel road.

There isn't much of a parking lot and when we got there at 7:30 we were vehicle #5 and you could probably only fit 7 if they are packed in pretty tight. I'm sure you could probably park on the road on the weekend assuming the mining company isn't working then.

Also note that the "trail head" is not labeled at all. From the small parking area, you walk about 200 hundred feet and there was a 4x4 road to our left that said "Closed. Avalanche Danger". We ended up going up this path and it took us where we needed to go.

Distance
It's supposed to be around 8.3 but we ended up going 8.79 after some backtracking and bushwhacking. 

Elevation
You start out at around 10,000 ft. and end up around 13,500 feet. Overall, my Garmin said we had a total of 3,648 elevation gain.

Difficulty
This is a fairly hard hike. The distance isn't bad but a fairly short distance, you gain a lot of elevation. We took a slightly different approach than the normal trail should which caused us to do a lot more bushwhacking/scrambling up some fairly steep areas.

While the going up is hard due to elevation/pitch, going down is just as hard due to fairly loose rocks and the steepness. You will definitely need to be in good shape for this one.

The Hike
The first 1.3ish miles of the hike isn't much fun. You are on a 4x4 road and have a steady uphill climb on a fairly rocky road. Ruby Creek will be to your right and you can hear the water but won't be able to see it for a while. While on the 4x4 road, there is a branch off to the left that I have no idea where it goes. Make sure you stay to the right with the creek close to you.

After you've gone a little over a mile, you'll have a handful of creek crossings and will start to be able to see the mountains in the distance. This is where the trail starts getting pretty. Below is a screenshot of the path we took but it was not the correct one that is posted on AllTrails or other areas.


At one point in the trail, you are basically sharing the trail with a creek and it starts going uphill a little more and to the west. For some reason we missed this or decided to go the other way but at that point in time you should start zig-zagging up to the top of the mountain on your west side and then follow the top of it to Woods Mountain and then finally Parnassus. What we did was take the valley and followed the stream the majority of the way until we got right below Woods and then scrambled straight up. While it was fun to bushwhack through, the final scramble up was pretty tough.

Below is a picture from the valley with Woods on your far right. We went straight up to the top bushes just on the north side of the snow pack and then headed west to Woods. If you did the trail correct, you would be on the ridge to the west of this picture.


Once you get to Woods, you are awarded with great views all around you. 


Unfortunately you are also rewarded with a view of your next location, Parnassus, which makes you go down to head back up again. After the last vertical going to Woods, our legs were already tired so it was a trek to get up that final incline even though the distance wasn't that bad. Below is a picture from Woods, looking to Parnassus on the right.


Parnassus also provides some really good views of the valley you just came from and Bard Peak. If I had more time, I wish we could have gone over to it.


The final push down was similar to the route we took up. As I mentioned, normally you would come in counterclockwise and hit the ridge to the two peaks and go back down through the valley. We took a slightly different path through the valley which was fun but was also quite a bit more bushwhacking going down. No matter what, the mountains kind of funnel you into where you need to go so it's hard to get truly lost.


Minus the first part of this trail, I thoroughly enjoyed it. The creek crossings were fun, I enjoyed making my own path, and the views at the top were great. I would just highly recommend doing it the correct way to save yourself from being as tired before going up the final push.

Also, we didn't see anyone else from our side of the mountain and just a handful of hikers that came in from the Herman Gulch Trailhead. 

Wednesday, July 31, 2019

Red Deer Lake

Drive & Parking
It'll take a little under 1.5 hours from Denver to get to the trail head assuming you leave early enough to get past Boulder traffic. Once you turn west into the mountains you are on some very curvy two lane roads with a lot of bikers so there is a chance this can slow you down quite a bit.

The last portion and a small middle section of the trip is on a gravel road but they are very well maintained compared to most. The parking lot is a decent size but there are a lot of campgrounds nearby so you'll need an early start if you want any seclusion.

Distance
~14 miles even though we were stupid and went a little over 17

Elevation
Should be around 2,000 but yet again, we were kinda stupid and got lost and did ~2,500. Below is a quick screenshot from my Garmin that shows we blew past the Red Deer Lake turnoff and did a portion of Buchanan Pass Trail


Difficulty
The length in general would make this a fairly difficult trail. There are no technical portions but quite a few sections that are fairly steep. Some of the areas were fairly flooded so we had to share the trail with a lot of water and perform some rock hopping in places. This will vary quite a bit depending on when you go.

The Hike
Like a lot of other hikes this year, it's a steady climb up that follows the Middle Saint Vrain Creek. The creek is very pretty and there are a few waterfall areas that a lot of people walk to that aren't too far from the trail head.

Once you cross the creek, you start to get some better views of the mountains around you, which are very steep.


You'll then go through a slightly more wooded area and then have a turnoff to go to the lake to your right. Unfortunately the trail marker was down and it wasn't easy to see so we blew right past it and ended up going to the Buchanan Pass Trail for quite a while. Even though it was tiring, the pass was very pretty with some rolling mountain views. Most importantly, as we were turning around to go back, Ali spotted a baby and momma moose about 20 yards from us. It's hard to see in the picture below but you can see the baby to the right. Btw, Ali was very very excited about this!


As we made our way back down, we saw the portion of the trail that went to Red Deer Lake and took that. This is ~1 mile or so from the main trail and is a solid uphill portion for the majority of it. However, the lake was very pretty and worth the hike up.


Even though it's a long trail, we loved the combination of creeks, lakes, and mountain views. Plus, any time we see a moose it always bumps up the trail quite a bit in our book.

Splunk's Adaptive Response Framework

Before I start this post, I want to give a quick shout out to Splunk. I recently just got back from my first .conf and I have to say, overal...